1.20.2014

Office Chair Round Up

Office Chair Round Up


1./2./3./4./5./6.

We desperately need a new desk chair ever since I ruined ours with an upholstery project gone wrong (lesson learned- some things are better left to the professionals).

Here are a few I'm partial to.  Practically speaking, I think I need to go with a with a white chair since that is what will work with the room best.  Which one is your favorite?


1.17.2014

My Favorite Ikea Products

My Favorite Ikea Products


Ikea is one of those stores that always keeps pulling me back.  It houses some of my favorite decor items that I'm always buying more of.  After reading posts and reviews of Ikea products across the web, I thought to do a round up of my own favorites:

1. Ribba Frame- This comes in a ton of different sizes and is extremely versatile.  Especially great for gallery walls where you can group several of them together. 

2. Lack Table- I must admit, I wasn't too impressed with this the first time I saw it.  I quickly changed my mind after seeing the hacks you can make with this.  Also doesn't hurt that it now comes in glossy colors.

3. Expedit Shelf- I don't think this needs much explaining.  Great for organizing, using it as a bench or room divider.

4. Ritva Curtain- The first time I bought these it was to replace Pottery Barn curtains I originally bought for my sliding glass doors.  I thought I'd be sacrificing on quality in exchange for price but I was surprised how thick these curtains were.  Since then they've been my go to when I need simple white drapes.

5. Henriksdal Chair- Last but not least is this chair.  A version of the parsons chair, they hold up surprisingly well.  I've considered pricier chairs with the same look but you can't beat the price. 

What are your thoughts? Any Ikea favorites?

*This post is not sponsored by Ikea- just my own thoughts.


1.15.2014

New Kitchen Chairs

After what seemed like months of going back and forth I finally decided on some chairs for our kitchen....


I love how it's a classic chair but has a modern twist.  And after a ton of obstacles of having them be delivered, they are finally here.


I feel like I should add some pillows to add some color but I really do like the vinyl fabric since it holds up well against spills and it's easy to wipe down.


One more thing I can cross off the list... what do you think?

1.13.2014

Project DIY- playroom benches

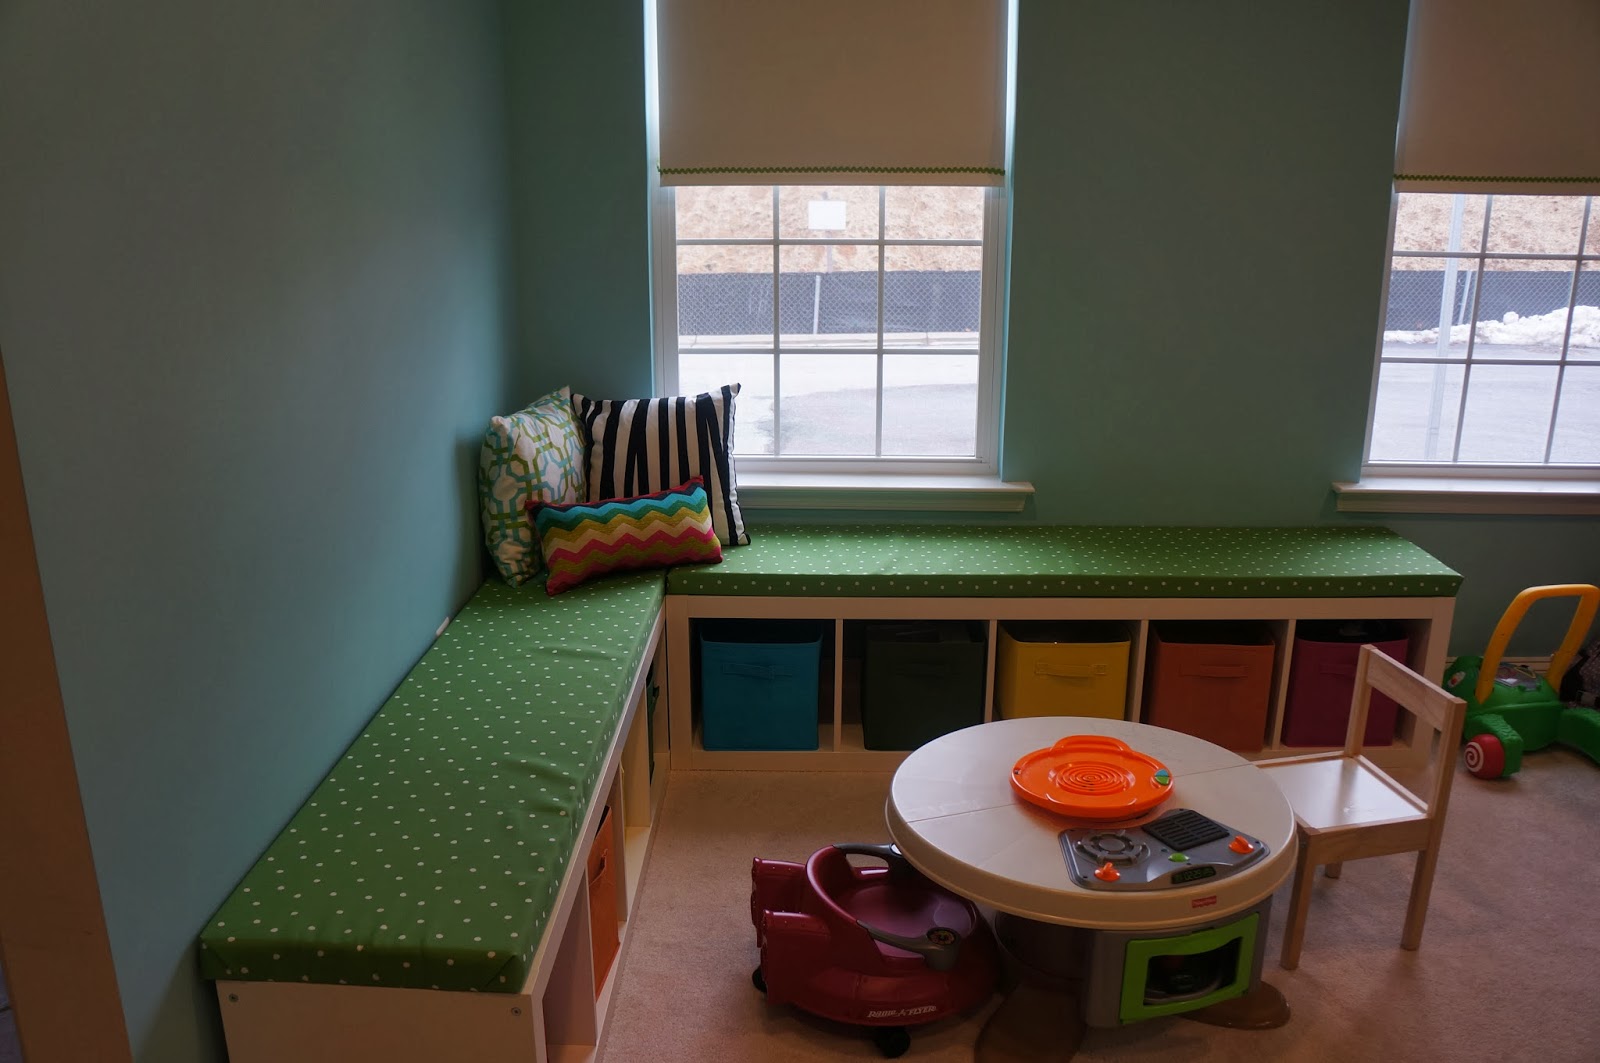
I can't take credit for this idea since I first got the idea after seeing it on iheartorganizing.blogspot.com.  However, the moment I saw it, I knew I wanted to recreate it for our playroom/office.


Here's a list of the materials I used:
  • 2 Ikea Expedit  Shelves
  • 2 inch foam, cut to size to fit on top of the shelves 
  • MDF, cut to size 
  • fabric
  • velcro-tape 
  • staple gun
I think the hardest part of this project was gathering the materials.  It was a pain to get the shelves from Ikea since they wouldn't fit in our car and when I first got the MDF and brought it home it ended up being too big so I had to bring it back to get it re-cut (which thankfully, was free).  The other pain was more financial since the foam was pricey but after searching high and low for other options I finally bit the bullet and bought it at Joann's.  After that though it was super simple.

I don't have photos of this but I first ironed out the fabric and then laid it down on a flat surface.  I put the foam directly on top of that and the mdf on top of the foam.  Next, I pulled the fabric so it was taught and using the staple gun, stapled it directly to the mdf.

Lastly, I had to attach the seat cushions to the shelves.  I chose to use long velcro-tape strips I found at Joann's. I was concerned at first it wouldn't hold up but I have to say it's quite sturdy.


That's pretty much it! For the storage, I went with cloth storage boxes.  Despite their material, I have to say they hold up pretty well and they also hold a ton of toys.


What do you think? Any toy storage ideas that work well for you?


1.10.2014

Project Organization- My Gift Wrap/Crafting Station

I don't know about you but gift wrap and crafting supplies seem to be one of those things that I can never find when I need it.  I always think I've put it in one closet or basket or another and I end up spending more time looking for it than I care for.

I thought of several ways of trying to keep everything organized but this system seems to be working for me.


The first thing I did was buy a pantry organizer.  You can probably pick these up from a lot of places but I got mine from Bed Bath & Beyond.  The next step was figuring out where to hang it.  I wanted to use a door in a room that is out of the way and not used a lot so for me it is the closet in the guest bedroom.

The nice thing with the hanging pantry organizer is that the shelves are adjustable.  So the ribbon has it's own shelf as well as various crafting tools.  


I used the bottom shelf to hold the actual gift wrap as well as gift bags, tape and labels.  To save space I used curtain clips with hooks to hang my tissue paper, envelope liners and stencils.


And that's it! Pretty simple.  What do you think?  

1.08.2014

Project DIY- Gold Silhouettes & Fabric Covered Mats

I don't know about you but one of the hardest parts for me in designing a room is thinking of suitable artwork.  I know what I like and what I don't like but for some reason I get to a point after decorating a room that I feel stumped.  And that usually always comes to choosing art.

One type of art I do like is the silhouette.  I especially love them grouped together as it's a nice twist to the traditional family portrait.  I especially love the ones in bright colors after I first saw in Jonathan Adler's store.  I figured it was a good project to try to DIY.

I decided that the best place to hang this would be in our playroom/office.  The room is painted a bright tiffany blue (which was a mistake by me- but more on that later).

First, I tackled the silhouettes.  I was able to hunt down photographs of each of us taken of our profiles.  I then copied and pasted it in Microsoft Word, cropped them and enlarged each to 7x9.  (I lack fancy photo editing software so Microsoft Word is my go-to).  Next step is to print them out and carefully cut out the silhouette.  After that, I painted over each paper-photo with gold acrylic paint I already had.  And your done- easy peasy.

Next I went to frame them using Ikea Ribba frames but I didn't like how the white backing blended with the matte and frame.  So I got the idea to add a pop of color by covering the mat with fabric.

I bought a half a yard of fabric from Hobby Lobby and went to town to cover the mattes.  I don't have photos of this process but it's pretty simple- I cut out a piece of fabric the same width and length of the matte and glued the edges down so it totally covered the matte.  Then I cut a hole in the center of the fabric and carefully cut diagonally up to each corner of the matte.  When you're done with this, you should be left with four triangles.  I then cut the tip off of each triangle and glued the remaining part to the inside part of the matte.

And here's the finished project- what do you think?


Overall I'm pretty pleased with how they turned out, especially for an afternoon of work.  What do you all think? Have you ever tried diying silhouettes?

1.06.2014

2014 Pantone Color of the Year- Orchid!

I love the 2014 color of the year.  Here are a few ways to infuse it in your day to day...


Untitled #5


1. A fuchsia chair gives a nice pop of pink to any room.  This one reminds me a bit of my own.
2. This clutch will brighten up any outfit.
3. I need these flats...
4. If adding furniture is too much, these coasters is a nice way to add some color to your decor without too much commitment.
5. These space saving hangers will instantly transform any closet.  I have these and they are the best.
6. I'm pretty much obsessed with these earrings and they can be casual or formal.